How to make GBA Fire Emblem battle animations
Making a battle animation is a fair amount of work. Be aware that no tutorial can make it quick and easy.
However, it will hopefully make it a little less intimidating.
Do note that this is specifically for FE-styled animations - it is not a tutorial on pixel art in general.
If you have questions or comments, the most reliable way to reach me is on my blog.
TL;DR / The short version
An animation consists of multiple images, one for each frame of animation.
- For a sword/axe/lance animation, you need a melee attack and critical hit, a ranged attack and critical hit, a dodge, and a miss animation (usually a copy of the normal attack).
- All of these are needed for each individual weapon the character can use: one for swords, one for axes, one for lances.
- For magic or bows you need an attack and critical hit (these are used at both 1 and 2+ range), dodge, and miss.
- Unlike melee attacks, casters normally use the same animation for all varieties of magic. Archers, while they usually do not have 1-range weapons, also use the same animation there if they do.
- For a staff user you need a staff raise and dodge.
- All animations should also come with a dodge animation for when the character is not wielding a weapon.
All images should use the same palette with no more than 16 colours total, including background (shown as transparent in the game) and shadow/outline colour (more on this here).
Each image should be 248 pixels wide by 160 pixels tall. (But see also: Piercing frames)
To insert them into the game, a text file with instructions on how to display them is needed. (See also: Scripting)
All files should be kept in the same folder.
The basics
Equipment
To make and insert an animation, you need:
- An image editor of your choice
- A text editor of your choice
- FEBuilder GBA
- A GBA Fire Emblem ROM (preferably Sacred Stones if you don't have a reason to use something else)
⚠ There is no magical One True Program to use for spriting so you should use whatever you're comfortable with. There are image editors that are specifically designed for pixel art and animation thereof, and you may find using one of them helpful, but it is by no means a necessity.
Optionally, you may find use for:
- Usenti
An option for handling paletted images. This may help you keep track of your colour usage if you don't use an image editor that does this normally. You can also use it to draw, but it does lack more advanced features such as layers.
- Paint.net
A relatively advanced image editor that supports things like layers, if you haven't already pirated Photoshop.
- Photopea
An online clone of Photoshop that runs in a browser.
- RotSprite
A utility for rotating and scaling pixel art that performs much better than most alternatives. Can be handy if you're making anything that spins. (You'll probably still need to clean the resized/rotated sprites manually though.)
- Irfanview
A quick, simple option for viewing and sorting images. You may find it especially useful if you are not using a program meant for sprite animation, to allow you to quickly page through images and preview how an animation will play out.
- Notepad++ or ConTEXT
A text editor with support for line numbers can be useful when debugging animation scripts.
All software recommended here is free and has a long history of reliability.
Format
The foundation of a gbafe battle animation is a series of images 248 pixels wide and 160 pixels tall. Each part of animation is its own image (referred to as a frame).

These are all the frames used for Eirika's animations - 47 in total. Some animations have more, and some less.
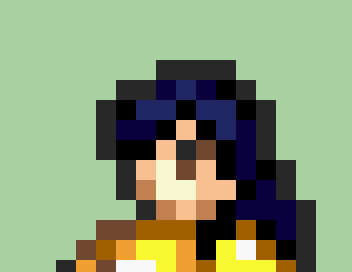
This is a full-sized version of the first frame. The 8 pixels wide column on the right are not displayed on screen.
What an animation contains
A full-featured battle animation for a character using swords, axes, or lances consists of frames for:
- A 1-range attack animation
- A 1-range critical hit animation
- A ranged attack animation
- A ranged critical hit animation
- A dodge animation while holding a weapon
- A dodge animation while disarmed
- A miss animation (usually just uses the normal 1-range attack)
- A script tying them together (see the scripting section for this)
The close-range attack and crit animations are usually where you put most of your effort, while the ranged ones - magic sword, hand axe, and javelin - are more simple.
Magic-users and archers typically use the same animations at 1 and 2+ range, so they take a bit less effort to make. Since casters are generally not depicted with weapons, they also only need one dodge animation, which can be used both when armed and disarmed.
Staff animations are even simpler and only have a staff use animation and a dodge.
⚠ Note that a character who can use multiple weapon types needs a complete animation for every weapon type they can use. You can usually re-use some of the material if making multiple melee weapons - swords and axes can usually get away with using the same motions, so you can simply make a copy of the animation and replace the weapon, perhaps with minor additional edits. (It is probably easier to start with the sword animation and make the axe version later; adding the axe blade(s) is often easier than editing them out. However, this depends on the shape and size of the weapons. Consider it before you begin.) You should not, however, do the same with lances, as the motions will look awkward.
Do not save as .jpg
This is a tutorial on animation, not image formats, but unless you know what you're doing and have a reason to do otherwise, always save your images in png format. Do not save pixel art in jpg format; you will ruin it by doing so.
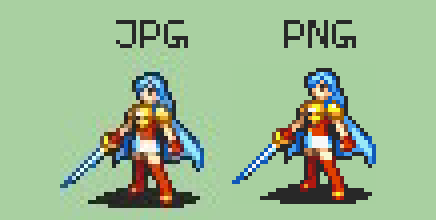
Note the "noise" and washed-out colours on the left. This not only looks bad but completely ruins the ability to keep track of the palette, which will be important.
Colour usage
Palettes
A battle animation can contain no more than 16 colours, including a background (which is rendered as transparent in-game) and shadow/outline colour (always 40R 40G 40B or #282828). Thus, you have 14 actual colours to work with.
⚠ Note that every part of the animation - every single image in it - must use the same 16 (or fewer) colours. Be careful not to add anything extra.
The selection of colours is called a palette.
Because the number of colours is limited, different parts of the character tend to share colours.

For example, here is Eirika's palette,
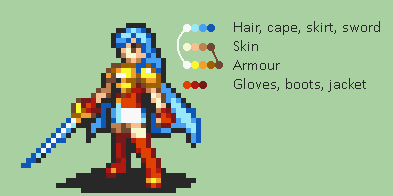
Her sword, hair, skirt, and cloak all use blue shades. The white from the skirt/sword is also used for highlights on the armour, and the darkest brown is shared between skin and armour.
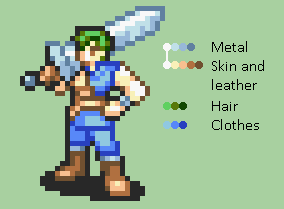
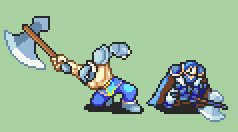
The mercenary shares white between skin and metal and five colours are used for his skin and leather accessories.
⚠ Colour sharing between metal and skin colours is a common complaint about vanilla animations. Try to avoid using the same colours in both locations. This will make it difficult to recolour the sprite when it is being used.
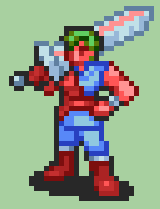
As an example, if we wanted our merc to have bright red skin, we cannot do so without also affecting the leather and metal - and vice versa.
(However, this is more of a concern for a sprite intended to be used by generic units; if the animation is intended only for one single character, such as a lord who only appears with one palette, it is less of an issue.)
⚠ It is best to finish deciding on a palette before you start animating. It is much easier than changing your mind halfway through and having to re-colour everything.
Colours can be changed on a per-character basis in the game, which is how the games give you, for instance, multiple cavaliers who have the same sprite but with different colours.
For the background colour (which will be completely transparent in-game) i recommend using a midtone colour that's nice and mellow, but different from anything you intend to use in the sprite. A very dark background will make your sprite look brighter than it will seem in-game, and a very light background will make it seem more dull.
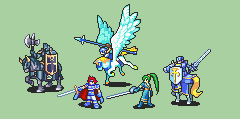
Mounted units often need to use fewer colours for each area to allow for colouring the mount. I do not recommend starting out making a mounted unit as your first sprite.
Outlines and shadows
The outline/shadow colour should be the darkest one in your palette; anything else being darker than it will result in the sprite looking off and the outlines looking washed out.
Note that this colour is not fully black, but 40 40 40 in rgb values or #282828 in hex. As such, you should never use pure black in an animation. For "black" details, use dark grey or dark, muted shades. Cooler colours like blue and purple are common here.
(There is nothing actually stopping you from using other colours - the shadow/outline is just one of the 16 colours in your palette, same as any other - but your sprite will stick out if you do so and i would very much recommend against it.)
While referred to as shadow/outline colour, not all outlines are drawn using the outline colour.
There are no hard rules for what is and is not drawn in outline colour - the mercenary's clothes partly use the darkest blue as the outline while the fighter's fully use the "outline" colour. However, the blades of weapons generally use the darkest metal colour, and skin often uses the darkest skin colour.
Even that is inconsistent - for instance, the outline on Eirika's face uses the outline colour.
Outline is also used - somewhat sparingly - inside the sprite when something needs to be strongly outlined. The eyes are usually drawn in this colour, but that is not always the case either, with some sprites like the mercenary using other colours.
⚠ While this means you have a lot of freedom with the outline, the outline colour is expected to be present on a large portion of the sprite. A sprite without it will not "pop" as much compared to the ones using it.
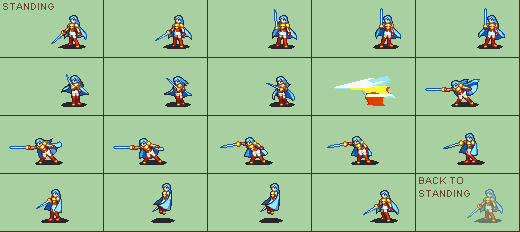
Start drawing
Making your first frame
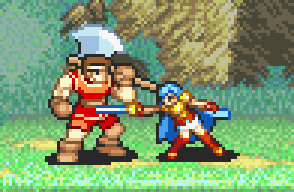
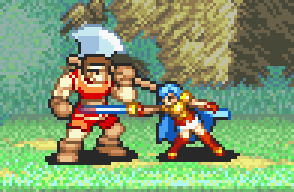
When you're ready to begin creating your animation, i recommend starting with the standing frame. This is what you'll be looking at any time your character is not moving.
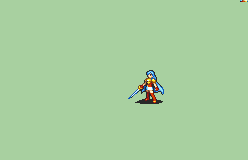
This is an example of a standing frame. All animations begin and end with the standing frame and making it look good should be a priority.
The standing frame should face the camera at an angle - don't draw the character straight from the side, even if it makes the most sense for them to face their opponent directly.
Try to draw a neutral and "casual" pose - as this is the default for almost all existing animations. If the character is holding a weapon, it's pointed down, resting on the ground or on their shoulder, or somehow otherwise at rest.
There are a few exceptions - notably, Lyn when equipped with the Sol Katti, and Roy, but mostly mounted units who hold their weapons in their "back" hand, who hold them up so you can see them. But even Roy and Lyn's stances are quite subdued and not really "action" poses.
This is not to say your starting pose cannot differ from this, but it will stick out more as modded material if it does.
After making the standing frame, make sure you have no more than 16 colours. If you draw in something that is not meant for pixel art, you may find Usenti the easiest way to do so.
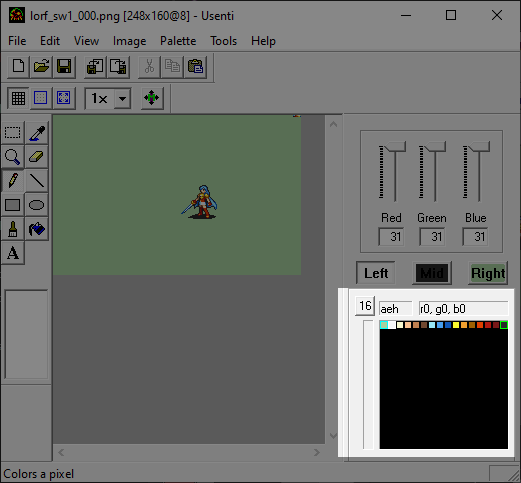
In the bottom right side of the Usenti window, you can see the number of colours displayed (16 in this case) as well as view all the colours in the image.
⚠ If there are more than 16 colours, you should correct this before doing anything else with the sprite. Remember that the same colours should be used for the entire animation. If you leave extra colours in and begin animating, you will eventually have to edit every frame to get rid of them!
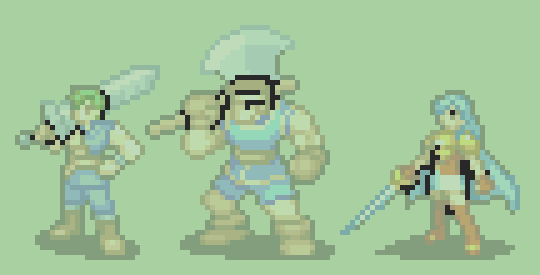
Build and proportions
You have total freedom to make a character as tall or short, thin or wide as you like (within the constraints of the screen), but before doing so you should understand the typical size and dimensions of a character in the gbafe style.
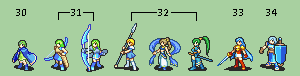
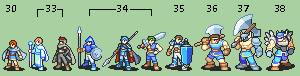
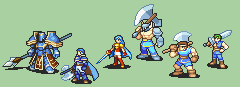
"Standard" height for women - for characters standing up straight - is 32 pixels, from the tip of the forward foot to the top of the head. For men, it's 34 pixels. Anything below that comes across as short, and above it, tall. Height varies between classes, with physically powerful classes tending to be on the taller side, but within the same class men tend to be one or a couple of pixels taller than women.
For human characters, the shortest sprites, used by the youngest characters like Nino and Ewan, are 30 pixels tall. The tallest woman in vanilla FE appears to be the hero (only used by Echidna) at 34 pixels, and the tallest man the warrior at 38 (although the fighter might be as tall if he straightened up). Height varies more if non-humans are included - Myrrh is only 28 pixels tall, and the cyclops is 59.
Generally speaking, unpromoted characters tend to be a little shorter than promoted ones.
Building a frame
Ok, so you know what you want to make and how big it should be. So how do you make it happen on the screen?
Learning how to make pixel art is its own entire thing and beyond the scope of this tutorial, but there are many guides you can find online if you want to look deeper into it. However, here are two ways to get started.


Start by drawing a stick figure or block out a silhouette. I like to do this next to an existing sprite that is about the same size as what i'm going to make, so i have a reference for height and bulk readily available.

It also helps to use different colours to identify parts of the sprite. Just make sure not to leave any stray colours behind when you finish up the frame.

From there, you can begin to refine the shape by filling in and erasing bits until it looks about right. Here you can also start applying the proper colours.

Once the shape is right, you can begin to fill in shading and details and add outlines, highlights and shadows.

While the light source should be above the character, in order to add volume, FE sprites generally have more highlights on the side facing towards the camera and less on the side facing away. However, the extent to which this is done varies, so feel free to experiment with it.
The character's shadow is also part of the sprite. It is generally mostly a blob around the feet, but anything that sticks out will tend to be shown casting a shadow as well - in the height comparison above, Eirika and Ephraim have their weapons pointing out and their presence is shown with a "point" on the shadow. Amelia's spear is resting on the ground and it and her arm are shown casting a full shadow.
⚠ Critique from other artists is an invaluable aid. Don't be afraid to seek assistance both during the process and once you feel you've finished. A fresh set of eyes can usually spot problems that might slip you by as you work on the image.
Another thing that helps is flipping the image horizontally, so that the character faces right instead of left. The change in perspective can often show you issues you may not have noticed before.
Positioning
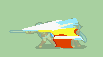
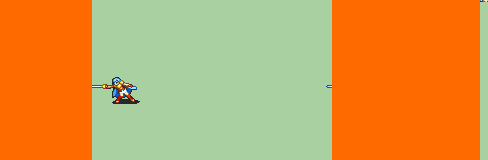
The standing sprite (what is displayed when the character is not moving) should be centred around 150 pixels from the left and their feet (or whatever appendages they rest on) centred about 102 pixels from the top of the image.
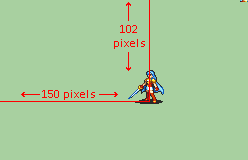
As with most things, this is an approximate guideline, not a hard rule - some characters stand closer to the front and some closer to the back.
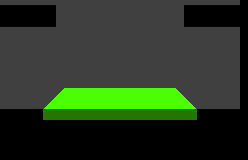
The green platform is where the characters stand, and where most of the action should take place. All areas in black are covered by the UI or otherwise not shown.

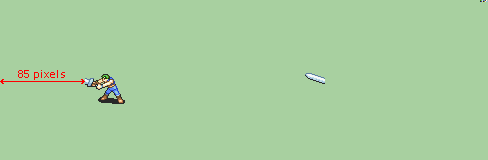
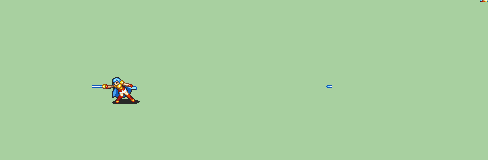
When planning your attack motions, also consider the enemy's position. It will be roughly 60 pixels from your character, 90 pixels from the other side of the screen.
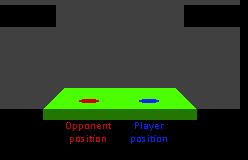
This may be useful as a template to keep track of where both combatants should be.
⚠ Note that ranged animations use the same positioning! The game will handle the screen scrolling automatically.
⚠ Be careful with going "off screen" and extending parts of your sprite outside the top or sides of the grey area. This will cause visible cut-off during screen vibration. However, it should not be a problem if done at a point where there is no vibration.
Animation
Animations are made up of a series of still images played in succession; they do not actually move, as such, but it looks to our brains as if they do.
Keyframes and inbetweens
These images can, simply put, be divided into the ones that make up the core of the animation, and the ones who serve as transition between the former. They are called keyframes and inbetweens respectively.
As an example, here are the images that make up Eirika's attack animation. It is made up of 19 individual images.

In sequence, they look like this. However, not all these images are strictly necessary for you to get the picture.

If we take out some of these,

the animation does of course look much worse, but you still understand perfectly what is happening here from just these five images.
⚠ When building an animation, it is a good idea to begin by planning and drawing strong keyframes. Then, once you have the foundation of the animation down, you can begin to add inbetween frames to smooth the transition between them. (This is not to say you can't go from frame to frame and improvise as you go along, but it's easier to mess up if you go that way.)
Smears
Smears are a type of motion blur inbetweens that deserve a more thorough look.
Smears are used to show a quick motion such as a slash or thrust, but also anywhere else you may find it useful.
(This gif is slowed so you can see the individual frames better.)
Smears do a lot of work in GBAFE animations, making them feel nice and snappy and giving them a distinct look. Just about every animation uses them at some point.
They are also a time-saving technique for an animator who doesn't need to draw additional inbetween frames to denote movement. Even our bare-bones Eirika from the previous section can be made to look smoother and more impactful with even the most half-assed smear frames:

(That being said: this is very much an example of how not to do animations. Use smears to add flair to your movements, not as a crutch to get away with lazy animation.)
Smears do not need to be physically possible or make sense on their own. They only need to look good in motion, as a transition between other frames.
(To an extent this is true for inbetweens in general, but Fire Emblem animations do not tend to deform sprites much.)
To make a smear frame, i recommend using the frames before and after it, overlaying them on each other with transparency.

Then you can draw the smear over that on a new layer to show the transition between them.
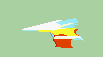
There are many ways to draw smears in different art styles, but FE animations use simple shapes and bright shades to pop during the few frames they are on screen. They do not include details or outlines. Keep in mind they are supposed to convey motion - they only display for a fraction of a second. They also do not include crazy visual effects - so while some games might have a spear thrust accompanied by a shockwave that covers half the screen, this is generally not a good idea if you're trying to make something that looks at home in GBA Fire Emblem.
Melee-range attack and crit
For sword/lance/axe users, the melee attack and especially crit is what you spend your effort on. Don't skimp out; these are the ones you'll see the most of.
The regular attack doesn't need to be very fancy,

but the crit is where you put all the spinning, twirling, jumping, making funny faces, kind of stuff you've got.
A critical hit can be as simple as the normal attack with a flourish added, but the more unique it is the more impressive it will look.


Mages and archers only have one attack and one crit animation which is used at both 1 and 2+ range, so there is no excuse to slack off on it if you are making one of those.
⚠ If making a caster, if you want the character to have dramatic wind effects during casting, like this
you may also want to prepare a few frames that can be looped seamlessly of hair/clothes moving in the wind. How to make this happen in the game is covered in the Scripting section Note on capes.
Piercing frames
⚠ Note that this section applies to melee attacks and crits only. Thrown weapons, bows and magic do not have piercing frames.
⚠ Despite being called "piercing" frames, and this being the main use for it, this method can be used for any purpose involving placing your character, in part or full, closer to the back than the opponent.
When a character hits another, you'll notice that the weapon generally seems to go into the target.
Eirika's sword actually extends farther than this
but part of it is shown under the enemy to give the illusion that the opponent is getting skewered.
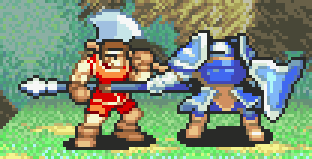
With longer weapons, like spears, you may see it emerging behind the opponent as well.

This is accomplished through piercing frames. This is an image that contain two frames at once, which both get displayed at the same time - the left one is placed over the opponent, closer to the "camera", and the right one under the opponent.
How you divide them depends on the animation but in Eirika's case the cut-off happens at 92 pixels from the left side of the image, leaving six pixels of her sword to get stuck into the opponent.
This is not entirely consistent between animations - for instance, the mercenary's sword sticks in the enemy several pixels farther to the left. Ultimately, you have to decide for yourself where to make it happen.
⚠ Make the piercing frames last, after you are finished with the animation. It is even more work if you want to change something later and have to start editing the piercing frames as well!
The easy way to make a piercing frame:
Take your attack frame.
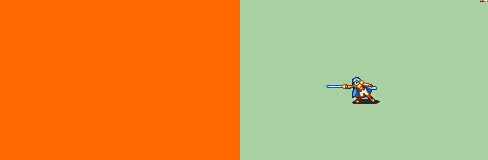
Expand it by 240 pixels to the left (for a total width of 488). Make the background a different colour to make this easier.
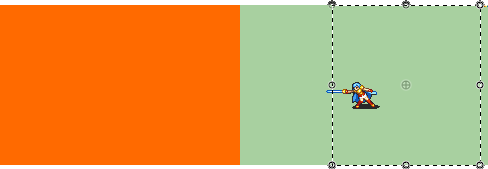
Select the part you want to display on top. To make it easier to align the parts, select the entire image to the right of the cut-off point, from top to bottom.
⚠ However, do not include the outmost 8 pixels on the right side of the image. Leave them where they are.
Move it left so it covers the rightmost part of the new area. It should be flush with the original part, with no space in between them and no overlap. It should also not extend above or below the border of the image. If you have trouble seeing if it lines up, zooming in helps.
Once everything is properly positioned, fill in the gaps with the correct background colour and save this as a new image. Then repeat this process with every frame that should have this. Generally, it is only a small handful per animation - Eirika who's been serving as my example for most of this has three piecing frames, using the same ones for both her normal and critical hit.
⚠ Do not save over your original frames! You will need the un-piercing ones for the "miss" animation. I recommend naming them similarly (for example, if you are making a piercing version of an image named attack10.png, name the version with piercing frames attack10p.png).
⚠ Make sure to cut the image in the same location every time. It will look bad if the spot where the weapon pierces moves throughout the animation!
⚠ Resist the urge to use piercing frames to "cleave" an enemy down the middle. Slamming a weapon into the ground between the opponent's feet looks great when the opponent is facing forward

but with units who face the other way, it completely breaks the perspective:

There is a reason the games only show weapons being stuck partly into the opponent or passing through at an angle during attacks coming from above:
Ranged attacks
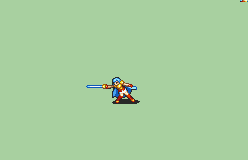
For melee fighters, their ranged attacks are normally very simple compared to the melee attacks.

In this case it is only two frames beside the standing frame,

and even the critical version is not very elaborate.


Other animations are not much better. So while you don't have to skimp on this, you can without sticking out.
⚠ You should not draw the projectile itself flying across the screen for a thrown weapon - it gets added automatically in the game. Include it only when the character is holding it.
⚠ Note that the game handles the screen scrolling during ranged attacks automatically. Do not add this in your animation.
For hand axes, the character should have a catching motion as the axe returns. For javelins, the spear just re-appears in the character's hand. Magic sword animations generally don't have an attacking motion at all, they just get held up.
For mages and archers, the ranged attack is usually identical to the melee one.
The dodge animation
The typical dodge animation is very simple. It starts with your standing frame and ends with a frame after dodging, and plays a single transition frame between them.
Note that to be complete, an animation needs to also have an unarmed dodge animation. Usually, you can start with the unarmed dodge and then add the weapon in after, unless you want them to look different.
The miss animation
The miss animation is usually identical to your normal 1-range attack animation, but without the piercing frames and the hit visual/sound effects. (This is why you should not overwrite them when you make the piercing frames.)
⚠ Technically you can make the miss animation look different from the normal attacks - the vanilla Fighter animation does this, for instance - but most animations don't bother.
Scripting
Overview
A script is a plain text (.txt) file.
It consists of 12 parts or "modes", but two of them are handled automatically. So, you need to script 10 separate things. They are:
1: Melee animation
(You don't need to worry about 2)
3: Melee critical animation
(Don't worry about 4 either)
5: Ranged animation
6: Ranged critical
7: Dodge melee attack
8: Dodge ranged attack
9: Equipped with melee weapon
10: Standing motions
11: Equipped with ranged weapon
12: Attack missed animation
In practice, 7 and 8 are identical, 9/10/11 are just a single standing frame, and 12 is the same as 1 with minor differences.
How the script works
If you export an animation, you'll find that it comes with a text file. Opening it shows a lot of lines that look like this:
1 p- lorf_sw1_000.png
It may look overwhelming, but don't panic - it's actually pretty simple. Let's break it down:
1
This number determines for how long the frame is visible in frames, or 60ths of a second. The higher it is, the longer the image displays.
p-
This is always present so don't worry about it.
lorf_sw1_000.png
This is the image being shown. You can use any name you like and i recommend making use of that ability. If you name the frames attack001, attack002, and so on, it's easier to know you're getting the right frames in the right order.
So, in full, this line means to display the image named lorf_sw1_000.png for one 60th of a second before showing the next step of the animation.
⚠ Frames showing movement typically display for around 2 to 7 frames. A pause, such as between raising a weapon and striking, might last for 10-30 frames. Larger, bulkier units tend to move slower, and show each frame for slightly longer than smaller, nimbler ones. Very few things outside the standing frames at the start - which also display at all times the character is not animating - are displayed for just one frame.
Next, there are lines that looks like this
C03 #Start attack animation; should be followed by 0x07
Anything beginning with a C is an instruction for the game to do something. Some of these are required to tell it when and where an animation starts or ends. Some of these are for playing various effects. The # indicates a comment; in this case it lets you know this is one of the required commands.
Finally, there are lines that denote the beginning of each mode
/// - Mode 1 #Melee Animation
and
~~~
lines that denote the end of that section.
Here is a "cleaned" script with only the necessary commands in it. You can use it as a basis for your script - copy the contents into a new text document and save it in the same folder where you keep your animation images, then edit it according to the instructions below.
You may also want to take a look at a complete script for reference - this is Eirika's. I have also made a version that shows the images instead of the file names to help visualise the process.
Melee attack and crit
The basic form of a melee attack with only the required code looks like this:
/// - Mode 1 #Melee Animation
C03 #Start attack animation; need 07 right after this.
C07 #Start attack animation; need 03 right before this.
Here the animation starts. Begin with the standing frame, then insert everything up to the hit connecting.
C04 #Prepare HP depletion routine; needed to animate return to standing frame after hit
C1A #Normal hit
C1F #Play hit SFE (sounds like Eliwood with sword's hit)
This happens after the hit, up until the animation stops to await the enemy's HP depleting.
C01 #NOP
This happens after the HP stops depleting. It includes the character returning to the standing position.
C06 #Begin opponent's turn after hit.next code 0D.
C0D #End of dodge animation. preceeded by 0x06
~~~
Using this as a template, you can insert the image display lines like this:
/// - Mode 1 #Melee Animation
C03 #Start attack animation; need 07 right after this.
C07 #Start attack animation; need 03 right before this.
1 p- standing.png
3 p- attack01.png
3 p- attack02.png
3 p- attack03.png
C04 #Prepare HP depletion routine; needed to animate return to standing frame after hit
C1A #Normal hit
C1F #Play hit SFE (sounds like Eliwood with sword's hit)
3 p- attack04.png
3 p- attack05.png
3 p- attack06.png
C01 #NOP
3 p- attack07.png
3 p- attack08.png
3 p- attack09.png
C06 #Begin opponent's turn after hit.next code 0D.
C0D #End of dodge animation. preceeded by 0x06
~~~
If you have named your images properly, you should have no trouble putting them in the correct order, simply going from the first to last.
The critical hit works exactly the same way as the normal attack but with the command
C1A #Normal hit
replaced with
C09 #Critical hit
and of course, you need to insert your critical animation instead of the normal attack.
Magic and ranged attacks
⚠ If you are making an axe user, read the note on hand axes. If you are making a mage, also see the note on capes.
Both magic and ranged physical animations function very much the same way as the melee versions, but these commands
C1A #Normal hit OR C09 #Critical hit
C1F #Play hit SFE (sounds like Eliwood with sword's hit)
are replaced with
C05 #Call spell associated with equipped weapon
This is true for physical attacks as well; "spell" just means it uses a magic animation to produce the thrown spear or whatever.
For these animations, the same command is used for both normal and critical hits.
A template:
/// - Mode 5 #Ranged Animation
C03 #Start attack animation; need 07 right after this.
C07 #Start attack animation; need 03 right before this.
1 p- standing frame
frames up to the attack going off
C05 #Call spell associated with equipped weapon
Everything between the attack going off and waiting for hp to deplete
C01 #NOP
C06 #Begin opponent's turn after hit.next code 0D.
Return to standing animation after hp depletes
C0D #End of dodge animation. preceeded by 0x06
~~~
Staves
Staff scripts are the most simple of all. The same code goes in modes 1, 3, 5, 6, and 12:
/// - Mode 1 #Melee Animation
C03 #Start attack animation; need 07 right after this.
C07 #Start attack animation; need 03 right before this.
1 p- standing frame
transition frame(s) for raising the staff
C05 #Call spell associated with equipped weapon
1 p- staff fully raised
C01 #NOP
frames for lowering staff (often the same ones as raising it but in reverse)
C0D #End of dodge animation. preceeded by 0x06
~~~
Dodges
The dodge animation is very simple and typically consists of your standing animation, one frame where your character has dodged, and a frame between those two.
/// - Mode 7 #Dodge Melee Attack
C02 #Start of dodge
1 p- Standing frame
C0E #Start of dodging frames (should go after standing frame and before dodging animation)
3 p- transition frame
1 p- dodged frame
C01 #NOP
3 p- transition frame
C0D #End of dodge animation. preceeded by 0x06
~~~
Use the same code for modes 7 and 8.
Standing frames
Standing frames are just that: your standing frame.
/// - Mode 9 #Equiped with Melee Weapon
1 p- Standing frame
C01 #NOP
~~~
That's it. Mode 9, 10, and 11 are all the same.
⚠ It is possible to have a brief animation play at the start of combat by adding more frames here, but this is very much not expected and will stick out next to vanilla animations. Unless you know what you're doing, it's best to leave this simply as a standing frame.
Miss animation
The miss animation is generally identical to your attack animation but without the hit effects and no piercing frames.
To insert it, simply copy your Mode 1 and paste it into Mode 12, remove these lines
C1A #Normal hit
C1F #Play hit SFE (sounds like Eliwood with sword's hit)
and change any piercing frames to the non-piercing variant. (If you took my advice, you can simply remove the P from the end of the file names in the script.)
For magic/bows, no changes are necessary; just copy and paste Mode 1 into Mode 12 and you're done.
Unarmed dodge
The unarmed dodge animation is much the same as the armed version. The unarmed dodge script is only for the dodge; since they are unarmed, the character cannot attack. You can simply copy and paste the dodge script into modes 1-6 and 12 and ignore them.
The standing frames (modes 9-11) should also show the character unarmed.
Note on hand axes
Axes work a little differently from swords and lances; for mechanical reasons, the melee version and thrown version need two separate scripts.
In practice, you follow the same instructions, but for the melee version you can just leave mode 5 and mode 6 empty with:
/// - Mode 5 #Ranged Animation
1 p- standing frame
~~~
Then once your script is complete, make a copy of it and put in the thrown axe normal attack in mode 1 and 5 and the critical hit in modes 3 and 6. Script it the same way you did the melee attack but these commands
C1A #Normal hit
C1F #Play hit SFE (sounds like Eliwood with sword's hit)
should be replaced with
C05 #Call spell associated with equipped weapon
Note on capes
You may have noticed mages' capes keep flapping dramatically throughout their animations.
This is not required, but adds flair.
To make it happen, we use the L command. This allows you to set frames to automatically loop until the animation finishes.
For example, the mage here loops these four frames.
/// - Mode 5 #Ranged Animation
C03 #Start attack animation; need 07 right after this.
C07 #Start attack animation; need 03 right before this.
1 p- standing frame
frames up to the attack going off
C05 #Call spell associated with equipped weapon
Everything between the attack going off and waiting for hp to deplete
L
frames you want to loop while spell is being cast
C01 #NOP
C06 #Begin opponent's turn after hit.next code 0D.
Return to standing animation after hp depletes
C0D #End of dodge animation. preceeded by 0x06
For our mage here, instead of just the C01 command, it might look like
L
2 p- loop1.png
2 p- loop2.png
2 p- loop3.png
2 p- loop4.png
C01
Adding effects
The script we've created is bare bones and only has a hit noise. Most animations will need more than that to be complete. So, here is how to add any additional effects.
You may want to save this until you've confirmed that your animation works and the timing looks good. If so, see the section below first.
As noted above, lines beginning with C are instructions for the game to do something. Some of these are necessary, but some are just effects.
Here is a list of all the C commands in FE8.
These can be inserted at any part in the script to add additional effects to it. Simply make a new line and type or paste the command in there.
Some of the ones you may find useful are:
C14 #Heavy vibration of screen
C15 #Slight vibration of screen
One of these can be used when a heavy unit walks, or a unit lands from a jump, or anything else that might warrant some oomph.
C22 #Play short sword swinging SFE
C23 #Play shorter sword swinging SFE
C24 #Play sword slashing air SFE
C25 #Play wing flap SFE
C35 #Play longer wing flapping SFE
Assorted "woosh" noises which can be used when, for example, a weapon is swung.
C19 #Play bow pulling SFE
C1B #Play quick "heavy step" SFE
C1C #Play light horse stepping SFE; pitch decreases
C1D #Play light horse stepping SFE; pitch increases
C28 #Play electrical charging SFE
C2B #Play armored unit "leaping" SFE
C34 #Play heavy stepping SFE
C36 #Play sword unsheathing SFE
C37 #Play sword clicking SFE
C38 #Play heavy spear spinning SFE
And some assorted sounds that may be useful for various things.
You can also insert any sound in the game by using
S####
which allows you to play anything in the song table (click the "song table" button in febuilder) which despite the name also contains sound effects. Simply replace #### with the number of the sound you want. However, the list is long, so it's harder to find what you're looking for.
There are no particular rules for using sounds and effects, just slap them in where you think they'll work. It may also be useful to look at the scripts for existing animations and see how they do things.
Make sure you test the animation after making changes to make sure it looks and sounds how you want it to.
Inserting the animation
With the animation and script both finished, it is time to insert the animation into the game and test it out.
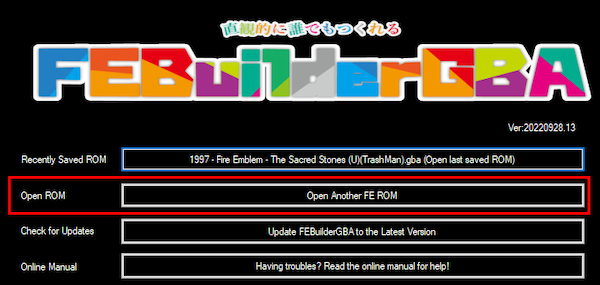
Open FEbuilder and select your rom. Once it opens, click Image editors, then Battle animations.
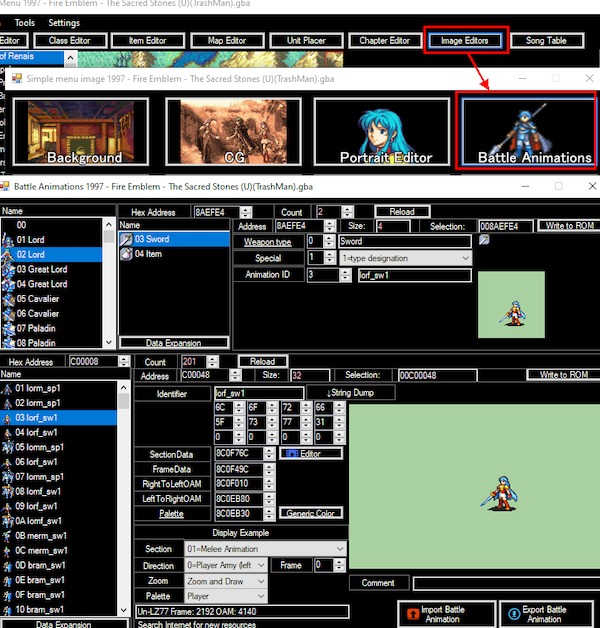
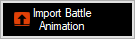
With the script and all images in the same folder, click the import battle animation button in the lower right corner, then select your script.
The easiest way to casually check an animation is to replace Eirika's sword animation and just start a new game and mash through the opening with the speed cranked up. (It does not matter if it's actually a sword animation or not, but see the section below for ranged attacks.)
You may be prompted to add additional patches. Accept and continue.
If the animation and script are properly made, you will be asked which colour is the background. Select it and continue.
You should then see the first frame of your new animation in the lower right section of the window. Now start the emulator (FEBuilder allows you to set this up to run when F5 is pressed, which lets you test changes immediately) and get into a fight. Watch closely, and make any changes you find needed. Then repeat the process of importing the animation and testing until satisfied.
If you have not added things like sound effects before now, you can go back and insert them once you're satisfied with how the animation looks.
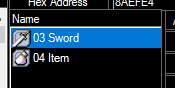
Finally, to insert the unarmed animation, click the "item" menu option and then import it as you did the previous one.
Testing ranged animations
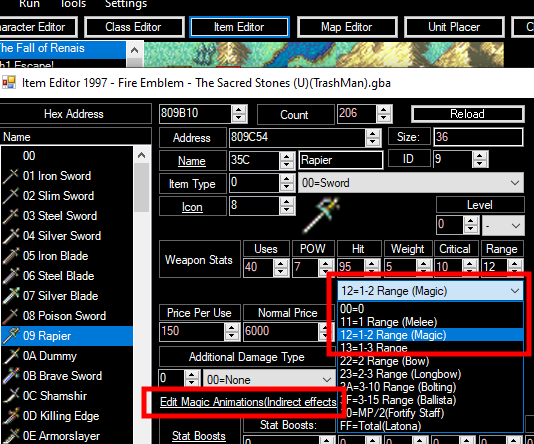
If you are testing a ranged/spell animation, you will also want to make the rapier a 1-2 range weapon. Go to Item editor and find the rapier in the menu on the left, then select 1-2 range (magic) in the menu, and click the Edit magic animations (indirect effects) link below.
That opens a new window. Here, select a magic animation in the Battle animation menu. Fire works well if you don't need a specific spell.
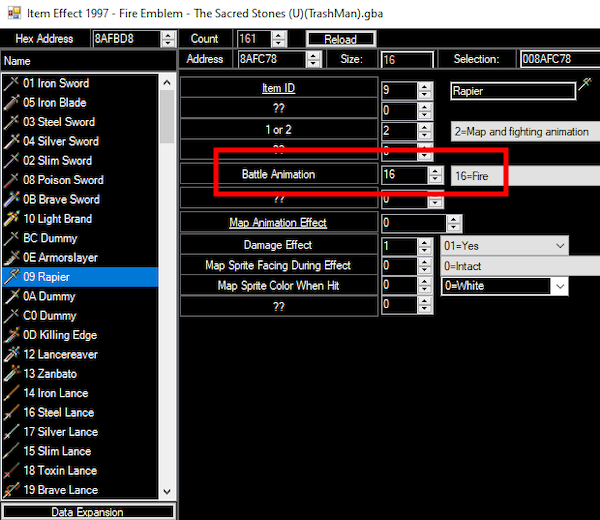
Then click the Write to rom button in the top right of the window and close it.

Then do the same with the previous window. You may want to save a copy of the rom with these edits made so you don't have to make them every time you test a ranged animation! You can do so under File > Save as.
Troubleshooting
If there is a problem with the animation, FEBuilder will warn of it. Read the error message carefully. Typical errors are colour errors (you may have too many colours, or some images don't have the same palette) and script errors (you may have a typo somewhere, or have missed adding or accidentally deleted or edited an important line). FEBuilder generally tells you which individual image or which line of the script it encountered a problem with.
If you can't figure out how to fix it, you can make a thread at feuniverse or ask in the discord. Make sure to actually post your animation/script so people can see it and help you troubleshoot. A service like dropbox is useful to facilitate this.
General tips
A collection of tips and tricks that did not fit elsewhere.
Learn to take criticism
When learning a new skill, nothing is more useful than the advice of those with more experience under their belt. You should never hesitate to ask for feedback.
The ability to take criticism means keeping an open mind, understanding that others may see things that you may not, and considering the advice you are given. Don't get angry at people who are pointing out flaws in your work - they are trying to help you and they may have a point. Do not dismiss suggestions out of hand, but consider how they would impact the work.
However, taking criticism does not mean being a doormat and agreeing with any- and everything you're told. After considering feedback, it is fine to decide you don't like it. In the end, it is your work, and how it ultimately ends up is up to you.
Posting your animation
When you have your animation inserted and tested and everything works as it should, you can export it in multiple formats to make it as easy as possible for others to use.
Obviously, if the animation is for personal use only, you can skip this.
Use the export button,
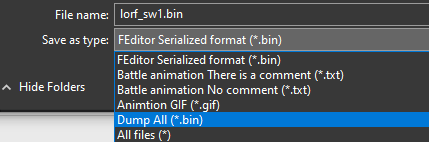
then select the "dump all" option. Do this in a new folder.
Once the animation is exported, take the folder you created and create an archive (.zip, .7z, .rar) of it. Now you can easily upload the entire thing (dropbox etc) for use.
The resource repository thread at feuniverse is one place where you can post resources and let others make use of them. Just make sure to read the rules first. You should also specify if your content is free to use (F2U) or free to use and edit (F2E).
Credit and permissions
Resources are usually either "free to use" (F2U) or "free to edit" (F2E). A resource that is F2U can be used by others, but requires permission for any edits edits beyond changing the colours. A resource that is F2E explicitly allows people to use and modify it as they wish without needing to ask. If you make your animation available for others, make sure to specify how permissive you want to be.
Also, if you wish some form of credit other than just your user name, make note of that when posting.
Other more restrictive options are not F2U/do not use, which as the name implies means it may not be used at all, and requires permission if you want more strict control over where it gets used. However, if it is not at least F2U, you should not post it in the resource repository. Making a personal thread to show off your work is perfectly fine as well.
Don't be lazy
Part of the charm of gbafe animations is that they are animated. It's tempting to save time and effort and just make your character swing an arm to attack and be done with it, but that not only fails to capture what makes the games look good, it sticks out next to all the proper animations as well.
Don't go overboard
Although being lazy is by far the easier mistake to make, you can make too much effort as well. If you make an animation that is far smoother and more elaborate than the vanilla ones, it will stick out! Animate in moderation and try to match the existing animations if you want to look at home among them.
Use references
As with any other art, don't be afraid to reference as needed. There are many animations both in vanilla FE and hacks that you can look at for reference - as long as you don't copy outright from animations that are not free to use.
Personally, when starting a new sprite i like to begin with a standing frame from an existing animation for reference and draw next to it. Pick something that's of a similar size to what your sprite should be; you can then easily reference the existing sprite to ensure you get the proportions and position right. You can also use the existing palette as a starting point.
Naming conventions
It makes your life easier if you name each frame in a logical order, both when it comes to viewing them and putting a script together. For instance, name your attack animation attack001.png, attack002.png, and so on, and do the same with the other ones.
Backups and versions
Always back up your work. It doesn't matter how - you can use an online storage like dropbox, a second hard drive, usb memory sticks, or email things to yourself. Animating is hard work already and few things suck the joy out of it more than having to do it all over again because something went wrong somewhere. Preferably do this every day once you've finished working.
Relatedly, keep multiple versions of your work, at least until you finish it. Any time you make an edit, it's better to save it as a new version, so you can go back to a previous one if you decide the edits did not work out. Pngs take up very little space and there is no reason not to keep them until you finish up. If having multiple versions around clutters up your workspace, you can always keep the old versions in a separate folder.